Introduction
dutch oven bread has become a beloved symbol of relaxed home baking in many American and European kitchens. With a simple dough and a sturdy pot you can create a loaf that looks and tastes like it came from a small artisan bakery. A Dutch oven traps steam around the dough which helps the bread rise high and form a deeply golden crackling crust while the interior stays moist and tender.
The idea of baking bread inside a heavy lidded pot is older than the name itself. Traditional cast iron pots were used over open fires in Europe and America long before modern ovens were common. Today home bakers use enameled cast iron or plain cast iron Dutch ovens to recreate the intense heat and steam of professional bread ovens. This method is especially popular with fans of no knead dough because it delivers impressive results with very little effort.
Many people love dutch oven bread because it feels both rustic and modern at the same time. The recipe is perfect for cozy weekends snow days or holidays when the house already smells like soup and roasted vegetables. It is also a relaxing project after a long work week since most of the time is hands off while the dough slowly rises on the counter.
In this guide you will learn a clear step by step method to make classic dutch oven bread with a crisp crust and soft open crumb. The recipe suits beginners yet it has enough depth and variation ideas for experienced bakers. Along the way you will find tips for vegan and dairy free versions plus gluten free and whole grain options. By the end you will feel ready to turn simple flour water yeast and salt into a bakery worthy loaf in your own kitchen.

dutch oven bread easy and delicious step by step recipe
Equipment
- Dutch oven with a tight fitting lid medium size around four to six quarts
- Large mixing bowl
- Wooden spoon or sturdy spatula
- Measuring cups and measuring spoons or a kitchen scale
- Parchment paper cut into a square or circle large enough to line the pot
- Clean kitchen towel
- Wire cooling rack or a board for cooling the loaf
- Oven mitts for handling the hot pot
Ingredients
These amounts make one medium round loaf of dutch oven bread.
- Three cups bread flour or all purpose flour about three hundred sixty grams
- One and one half cups warm water about three hundred sixty milliliters the water should feel slightly warm to the touch
- One and one quarter teaspoons instant yeast or active dry yeast
- One and one half teaspoons fine sea salt or kosher salt
- One tablespoon olive oil or neutral vegetable oil for greasing the bowl and parchment
Optional flavor additions
- One or two teaspoons sugar or honey for a slightly richer flavor
- One tablespoon extra virgin olive oil mixed into the dough for a softer crumb
- One or two teaspoons dried herbs such as rosemary thyme or oregano
- One half cup grated hard cheese such as parmesan folded into the dough after the first rise
- One quarter to one half cup mixed seeds such as sesame seeds flax seeds or sunflower seeds sprinkled on top before baking
Healthier and special diet ideas
- Replace one cup of white flour with whole wheat flour for more fiber and a nutty flavor
- Use a gluten free bread flour blend in the same total amount for gluten free dutch oven bread and handle the softer dough gently with parchment support
Instructions
- In a large mixing bowl combine the flour and salt. Stir well so the salt is evenly spread through the flour.
- In a smaller bowl mix the warm water and yeast. If you use sugar or honey add it now. Stir until the yeast dissolves and let it rest for a few minutes until the liquid looks slightly cloudy.
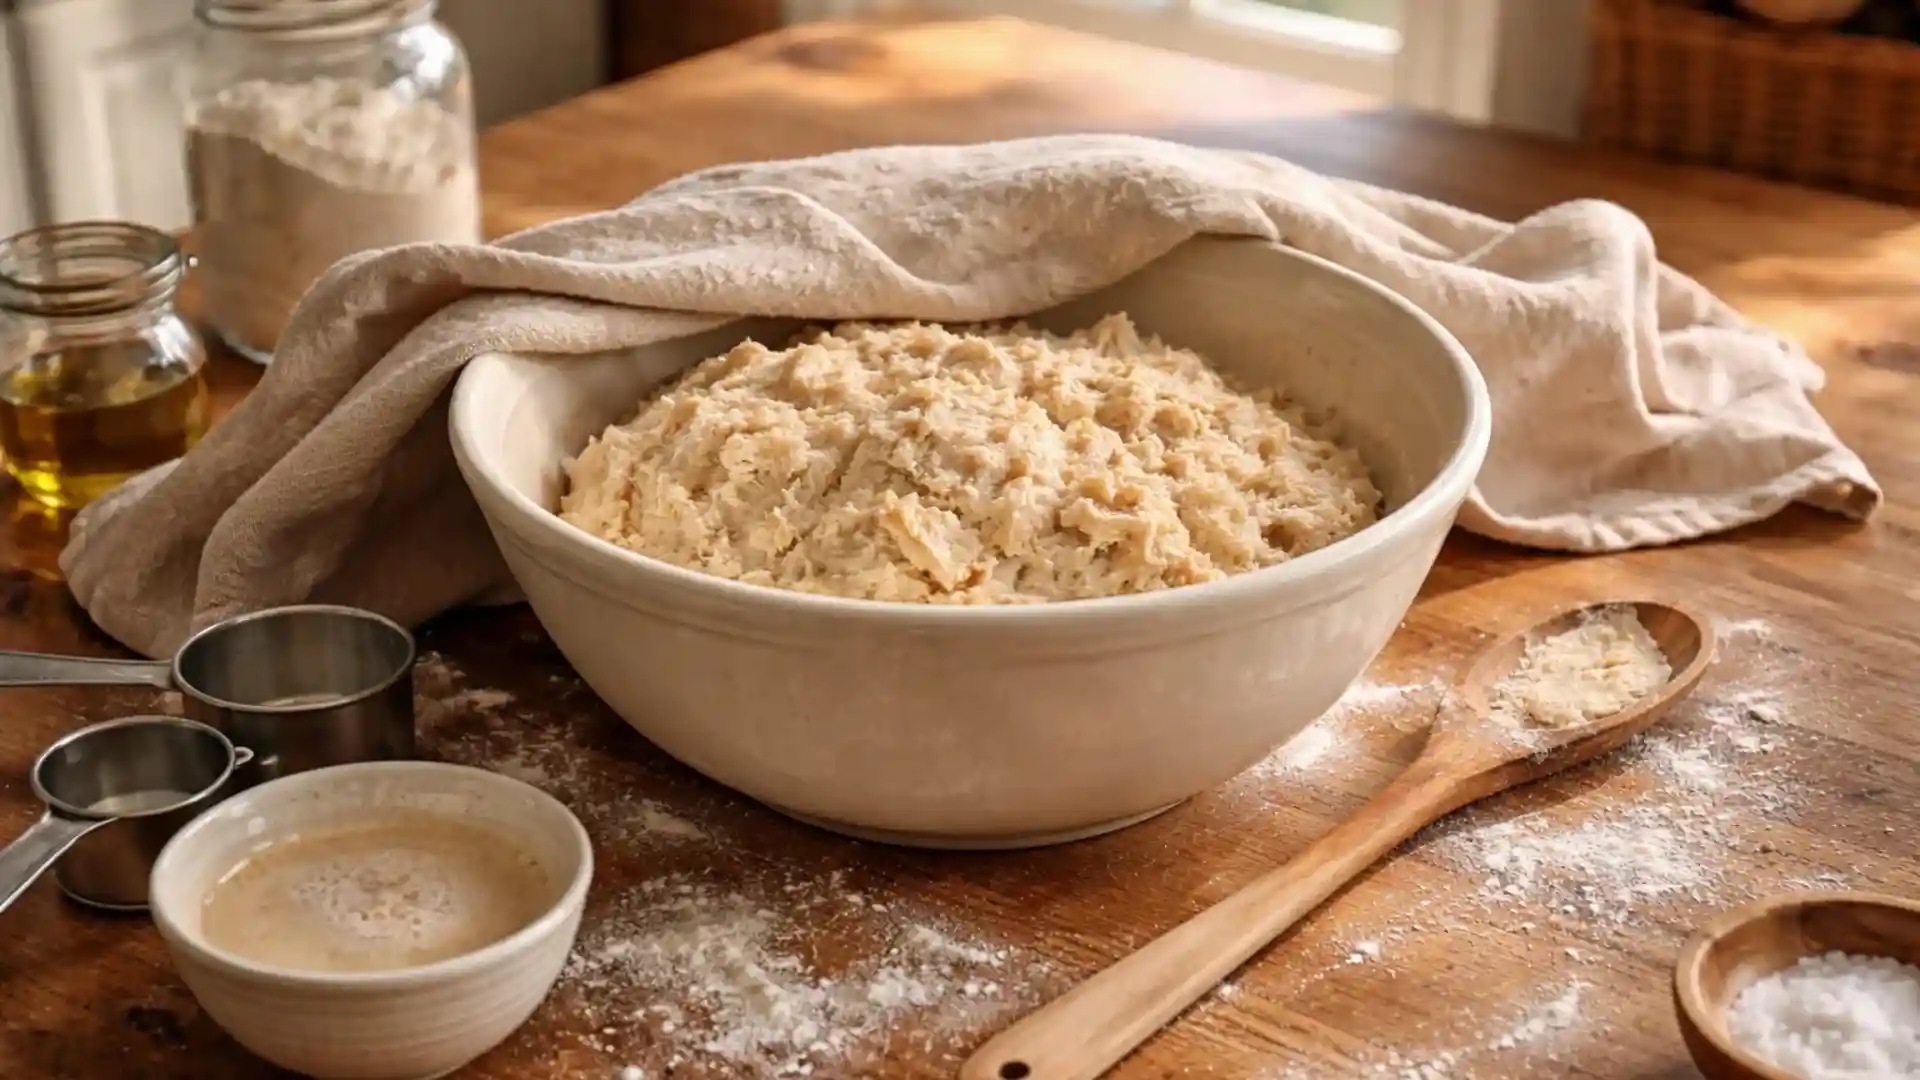
- Pour the yeast mixture into the bowl with flour. Use a wooden spoon or spatula to stir until all the flour is moistened and you have a rough sticky dough. It is fine if the dough looks shaggy and uneven.
- Scrape the sides of the bowl and gather the dough into a loose ball. Drizzle a little oil around the edges so the dough does not stick too hard as it rises. Cover the bowl with a clean kitchen towel or a loose lid.
- Let the dough rest at room temperature for about two hours or until it has doubled in size and the surface shows many small bubbles. In a cooler room it may need a little longer. This slow rise builds flavor for your dutch oven bread.
- Lightly flour a clean work surface. Use a spatula to gently ease the dough out of the bowl onto the flour. Try not to tear it so you keep as much air inside as possible.
- With floured hands lift one edge of the dough and fold it toward the center. Turn the dough and repeat this folding from several sides until it begins to form a rough ball.
- Flip the dough so the smoother side faces up. Use your hands to gently tuck the underside of the ball while you rotate it. This tightens the surface and gives the loaf a round shape that will rise well in the oven.
- Place the shaped dough on a piece of parchment paper. Lightly flour the top and cover it with a towel. Let it rest for about thirty to forty five minutes for a second short rise while you preheat the oven and Dutch oven.
- Place your empty Dutch oven with the lid on in the oven on a rack in the lower middle position. Heat the oven to four hundred fifty degrees Fahrenheit or about two hundred thirty degrees Celsius. Allow the pot to heat for at least thirty minutes so it becomes very hot.
- When the dough has puffed and the pot is fully heated carefully remove the Dutch oven using oven mitts and set it on a heat safe surface. Lift the dough by holding the edges of the parchment paper and gently lower it into the hot pot.
- If you wish you may lightly score the top of the dough with a sharp knife to guide how it opens. Work quickly so the pot does not lose too much heat. Cover the Dutch oven with the lid and place it back in the hot oven.
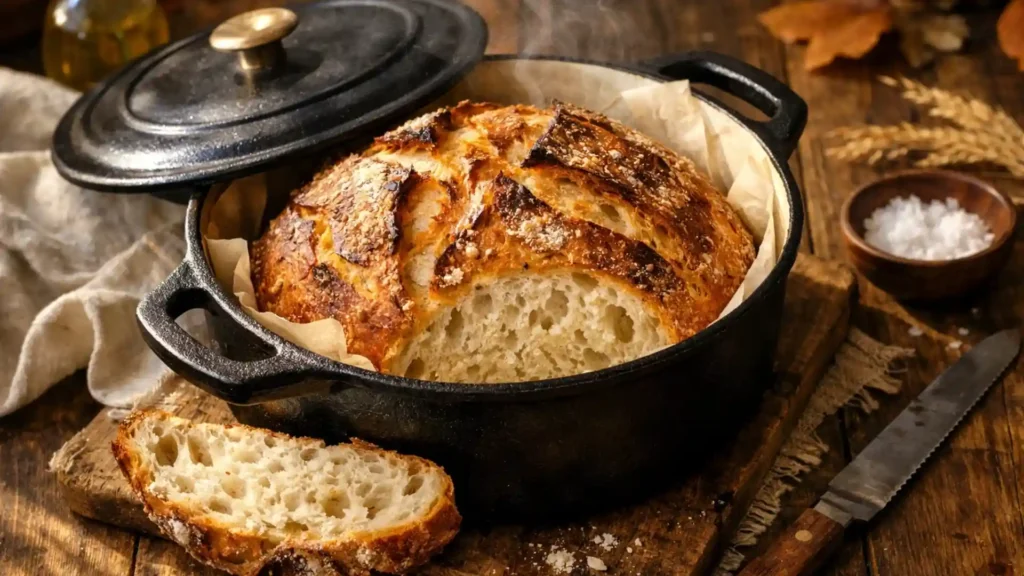
- Bake the dutch oven bread covered for about thirty minutes. The steam inside the pot will help the loaf rise and create a thin crackling crust.
- After thirty minutes remove the lid and continue baking for ten to fifteen minutes more until the crust is deep golden brown. The bread should sound hollow when you tap the bottom.
- Carefully lift the finished loaf out of the Dutch oven using the edges of the parchment. Place it on a wire rack or board to cool. Let the bread cool for at least thirty minutes before slicing so the interior can set and extra steam can escape.
- Slice with a serrated bread knife and serve warm or at room temperature. Enjoy your homemade dutch oven bread with butter olive oil soup salad or any favorite meal.
Notes
Ingredients for dutch oven bread
The basic recipe for dutch oven bread uses only a few pantry staples. To get the best flavor and texture it helps to choose ingredients with care. The list below assumes you want one medium loaf that serves about eight to ten people.
Basic ingredients
- Bread flour or all purpose flour about three cups which is close to three hundred sixty grams
- Warm water about one and a half cups which is close to three hundred sixty milliliters
- Instant yeast or active dry yeast about one teaspoon and a quarter
- Fine sea salt or kosher salt about one and a half teaspoons
- Neutral vegetable oil or light olive oil about one tablespoon to lightly grease the bowl and parchment if you use it
Optional flavor boosters
- Honey or sugar one to two teaspoons for a slightly richer taste and deeper browning
- Olive oil one tablespoon in the dough for extra softness and flavor
- Dried herbs such as rosemary thyme or oregano one to two teaspoons
- Garlic powder or roasted garlic for a savory loaf
- Grated hard cheese such as parmesan or a similar style cheese about half a cup for a cheesy crust
- Seeds such as sesame poppy or sunflower about a quarter to a half cup either mixed into the dough or sprinkled on top
Healthy and special diet substitutions
For a more wholesome version you can replace part of the white flour with whole grain flour. Try one of these variations
- Replace one cup of white flour with whole wheat flour. The loaf will be slightly denser but nutty and flavorful.
- Use one cup of rye flour with two cups of bread flour for an earthy rustic dutch oven bread.
For a vegan loaf the basic recipe is already suitable as long as you avoid honey and cheese. Use sugar or skip sweetener and focus on herbs olive oil and seeds.
For a gluten free version you need a high quality gluten free bread flour blend that already contains binders such as xanthan gum or psyllium husk. Use the same total volume of flour and follow the same steps but keep in mind that gluten free dough feels softer and more like a thick batter. You will shape it gently and support it with parchment paper when you move it into the pot.
Choosing quality ingredients
Good flour is the heart of any dutch oven bread recipe. Look for flour that is fresh and stored in a cool dry place. Unbleached bread flour gives stronger gluten development which creates larger air pockets and a chewier texture. All purpose flour still works very well and produces a slightly softer crumb.
Water should be clean and pleasant to drink. If your tap water has a strong chlorine smell consider using filtered water for better yeast activity.
For yeast check the date on the package. Old yeast may be weak and leave your bread flat and dense. If you are unsure you can test it by stirring it into warm water with a pinch of sugar and waiting for a light foamy layer to form.
Salt is more than a flavor booster. It strengthens the gluten network and helps control fermentation. Use a consistent fine grain salt so that it dissolves evenly throughout the dough.

Step by step preparation of dutch oven bread
This method focuses on a mostly no knead approach that relies on time and gentle handling rather than intense kneading. It is ideal for home bakers who want a relaxed process with reliable results.
Stage one mixing the dough
- In a large mixing bowl combine the flour and salt. Stir with a spoon or whisk so the salt is evenly distributed.
- In another small bowl stir the yeast into the warm water until it dissolves. If you use sugar or honey add it to this mixture. Wait a few minutes until you see a subtle cloudiness or tiny bubbles which show that the yeast is active.
- Pour the yeast mixture into the flour. Use a sturdy spoon spatula or clean hand to mix until all the flour is moistened. The dough will look shaggy and sticky which is exactly what you want for dutch oven bread. There is no need to knead vigorously.
- Scrape any bits of dough from the sides of the bowl into the center. Cover the bowl tightly with a clean towel or reusable lid.
Stage two first rise slow fermentation
Let the covered bowl sit at room temperature for at least two hours and up to twelve hours depending on your schedule and the temperature of your kitchen. A longer rise builds deeper flavor and a more open crumb.
During this time the dough should roughly double in size. The surface will show small bubbles and feel wobbly if you gently shake the bowl. If the room is cool you may need three to four hours for a good rise. If the room is quite warm the dough may be ready in about two hours.
Stage three shaping the loaf
- Lightly flour your work surface.
- Use a dough scraper or spatula to ease the dough out of the bowl without tearing it more than necessary. That gentle handling helps maintain the airy structure created during the rise.
- With lightly floured hands fold the outer edges of the dough toward the center from all sides. Imagine you are folding a square envelope over itself. After a few folds flip the dough so the smooth side faces up.
- Cup your hands around the dough and rotate it a little at a time while gently tucking the edges under. This motion tightens the outer layer and creates surface tension which helps the loaf rise upward in the oven.
- Place the shaped dough on a piece of parchment paper if you wish or directly on a well floured clean towel. Cover loosely and let it rest while you preheat the oven and Dutch oven. This short rest is called the second rise and usually takes thirty to forty five minutes.
Stage four preheating the Dutch oven
About thirty minutes before you plan to bake arrange a rack in the lower middle of your oven. Place your empty Dutch oven with its lid on the rack.
Heat the oven to four hundred fifty degrees Fahrenheit which is close to two hundred thirty degrees Celsius. Preheating the pot ensures a powerful burst of heat when the dough goes in which gives you springy tall dutch oven bread with a crisp crust.
Stage five transferring the dough
Once the pot and oven are fully hot carefully remove the Dutch oven using thick oven mitts. Place it safely on a heat resistant surface.
If your dough rests on parchment lift the edges of the paper and lower the dough into the pot. If you used a towel instead dust the top of the dough with flour then place a piece of parchment over it flip the dough onto the parchment and quickly lower it into the pot.
You can lightly score the top of the loaf with a sharp knife or a bread lame to guide how it opens in the oven. Make one long shallow cut along the length of the loaf or a simple cross pattern. This step is optional but gives a more controlled and attractive result.
Cover the Dutch oven with its lid again and return it to the hot oven.
Stage six baking the loaf
Bake the covered loaf for about thirty minutes. During this time steam builds inside the Dutch oven. That steam allows the surface of the bread to stay flexible long enough for the loaf to expand fully before the crust sets.
After thirty minutes carefully remove the lid and continue baking uncovered for ten to fifteen minutes. The crust will turn from pale to deep golden brown and become wonderfully crisp. If you prefer a lighter crust stop closer to ten minutes. For a more robust crust leave it until the full fifteen minutes but watch closely toward the end.
To confirm that the bread is done tap the bottom of the loaf. It should sound hollow rather than dull. Another sign of doneness is an internal temperature near two hundred eight degrees Fahrenheit measured with an instant read thermometer pushed into the center from the side. If you do not have a thermometer rely on color and sound and err slightly on the longer side instead of removing it too early.
Stage seven cooling the bread
Use oven mitts to lift the loaf out of the Dutch oven. Place the bread on a wire rack or a folded clean towel so air can circulate around it.
Resist the urge to cut into the bread right away. The interior is still finishing its structure and releasing steam. Cutting too soon compresses the crumb and makes it gummy. Give the dutch oven bread at least thirty minutes to cool and ideally about one hour. After that you can slice it with a sharp serrated knife into thick or thin slices as you like.
Tips and variations for dutch oven bread
Once you feel comfortable with the basic method you can experiment with many flavor twists and diet friendly adjustments. Here are some ideas to keep your dutch oven bread exciting from week to week.
Flavor variations
- Herb and garlic dutch oven bread
Add one to two teaspoons of dried herbs such as rosemary or thyme to the flour before mixing. For a stronger flavor stir in minced roasted garlic during the final folds of the dough. - Cheese and herb loaf
Fold half a cup of grated cheese into the dough after the first rise. Sprinkle extra cheese over the top right before baking uncovered during the last ten minutes. This gives a crispy cheesy crust that pairs well with pasta or salad. - Olive and sun dried tomato bread
Gently mix half a cup of chopped olives and a quarter cup of finely chopped sun dried tomatoes into the risen dough. Add a tablespoon of olive oil to keep the crumb tender. Serve with antipasto platters soup or roasted vegetables. - Seed crusted dutch oven bread
After shaping the dough brush the surface lightly with water. Roll the loaf in a mix of sesame seeds flax seeds and sunflower seeds before the final rise. The seeds toast as the bread bakes and add crunch and extra nutrition.
Adjustments for different diets
For a lighter loaf reduce the total flour slightly and add a spoon or two of extra water for a more open crumb. Use whole wheat or rye for part of the flour to increase fiber.
For gluten free bakers rely on a dedicated bread blend and consider adding a teaspoon of psyllium husk if it is not already in the mix. This helps the dough hold shape and gives better chew. Rise times can be shorter for gluten free dough since there is no gluten network to strengthen. Watch the volume rather than the clock.
For low sodium diets you can cut the salt by about one third. Keep in mind that salt helps control fermentation so with less salt the dough may rise faster. Check the dough a bit earlier to avoid over proofing.
Serving and presentation ideas
dutch oven bread is versatile and shines in many settings. Serve thick slices with hearty soups stews or chili on cold days. For a lighter meal toast thin slices and top them with avocado smoked salmon or marinated vegetables.
For breakfast enjoy warm slices with butter vegan spread or nut butter and a drizzle of honey. For gatherings slice the loaf into cubes and serve with dips such as olive oil with herbs hummus or baked cheese spreads.
To create an attractive presentation on a food blog style the loaf on a wooden board with a serrated knife crumbs scattered naturally and a small bowl of olive oil or butter. Capture a close view of the crust and a cross section that shows the airy interior. This visual storytelling supports your written content and encourages readers to try the recipe.
Nutrition information per serving
The exact nutrition values for dutch oven bread vary depending on flour type add ins and slice size. The following numbers give a general idea for one slice from a medium loaf made with white bread flour and little or no added fat or sugar. Assume the loaf yields about ten slices.
Calories per slice about one hundred fifty to one hundred seventy
Total fat about one to two grams mostly from any oil used to grease the bowl or pot
Carbohydrates about thirty grams
Fiber about one to two grams higher if you include whole wheat or seeds
Protein about five to six grams
Sodium about two hundred to two hundred fifty milligrams depending on the amount of salt
Vitamins and minerals small amounts of B vitamins iron and magnesium mainly from the flour. Whole grain versions offer more minerals and extra fiber.
To reduce calories cut thinner slices or choose a version with more whole grains and seeds which support satiety. To increase protein pair your slice with eggs lentil soup beans cheese or a high protein spread.
Common problems when making dutch oven bread and how to fix them
Even with a simple recipe things can occasionally go wrong. Here are frequent issues that home bakers face with dutch oven bread and practical solutions to recover or prevent them next time.
The loaf is dense and does not rise well
This often happens when the yeast is weak or expired when the dough water was too hot and killed the yeast or when the dough did not have enough time to rise.
Solution
Check yeast freshness by blooming it in warm water with a pinch of sugar before mixing. The water should feel warm but never hot to your finger similar to a comfortable bath. Give the dough enough time to double in size even if it takes longer than the recipe suggests. Cooler rooms need longer fermentation.
The bread has large holes in some areas and tight spots in others
Uneven crumb can result from hasty shaping or from very uneven mixing.
Solution
When you first mix the dough make sure all flour pockets are fully moistened. During shaping handle the dough gently but try to fold it in a consistent pattern. This helps distribute gas pockets more evenly. Avoid adding large dry clumps of cheese or fillings that could create gaps. Chop add ins finely and mix them gently but well.
The crust is too pale
If your dutch oven bread comes out pale rather than golden the oven or pot may not be hot enough or the bread may need more time with the lid off.
Solution
Allow a full thirty minutes of preheating for the oven and Dutch oven. If the bread is already cooked through but looks pale extend the uncovered baking time by a few minutes. You can also lightly brush the top of the shaped dough with a bit of oil or milk before baking which helps browning.
The crust is very hard and thick
A sturdy crust is part of the charm yet it should still be pleasantly crisp rather than jaw breaking.
Solution
Bake slightly shorter in the uncovered phase. Another trick is to cool the bread under a loose clean towel which softens the crust while still allowing moisture to escape. If your oven runs very hot consider lowering the temperature by a small amount in future batches.
The bottom of the loaf burns
A Dutch oven in direct contact with a very hot oven floor or rack can transfer intense heat to the bottom of the bread.
Solution
Place a baking sheet or another empty tray on the rack below the Dutch oven. This deflects some direct heat and protects the base of the loaf. You can also sprinkle a thin layer of coarse cornmeal on the bottom parchment before placing the dough. The cornmeal acts as a tiny buffer.
➡️ dutch oven bread recipes easy and delicious step by step method
Frequently asked questions about dutch oven bread
Can I use all purpose flour instead of bread flour
Yes you can. All purpose flour makes slightly softer dutch oven bread with a more tender crumb while bread flour gives more chew and larger holes. If you only keep all purpose flour at home use it without worry. You may need a touch less water so add it gradually and stop once the dough looks shaggy and sticky but not soupy.
Can I prepare the dough ahead of time for the next day
Absolutely. One of the best features of dutch oven bread is that the dough can rest in the refrigerator. After you mix the ingredients let the dough sit at room temperature for about one hour until it begins to puff. Then cover it tightly and place it in the fridge for up to twenty four hours.
When you are ready to bake remove the dough from the refrigerator and let it sit at room temperature for thirty to sixty minutes. Then shape it and continue with the second rise and baking steps. Cold fermentation deepens the flavor and often improves the structure of the loaf.
What is the best way to store dutch oven bread
Once the bread is completely cool keep it at room temperature in a paper bag or wrapped in a clean towel placed inside a bread box. This protects the crust while allowing a bit of airflow so the loaf does not turn soggy. Avoid sealing it in plastic at room temperature for long periods because that can make the crust rubbery and encourage mold.
For longer storage slice the bread and place the slices in a freezer bag with as much air pressed out as possible. Freeze for up to three months. To serve reheat slices directly from frozen in a toaster or a moderate oven until warm and crisp.
Can I bake dutch oven bread without parchment paper
Yes you can if your Dutch oven is well seasoned cast iron or an enameled pot with a reliable nonstick interior. To prevent sticking lightly oil the bottom and sides of the pot before you place the shaped dough. Work quickly to avoid losing heat. Parchment still makes handling easier especially for very wet dough and for beginners so consider it a helpful tool even though it is not required.
Can I double the recipe
You can double the ingredients to make two loaves. It is usually better to bake them one at a time unless you own two Dutch ovens and have enough oven space. Overcrowding the oven can lead to uneven heat and less dramatic crust. Mix a larger batch of dough then divide it after the first rise and shape each loaf separately.
Conclusion and call to action
dutch oven bread brings together the charm of old world baking and the simplicity that modern home cooks appreciate. With only flour water yeast and salt plus a little patience you can create a loaf with a golden crackling crust and a soft flavorful interior. The Dutch oven method makes success far more predictable than baking directly on a tray which is why so many American and European bakers rely on it for weekend loaves and special dinners.
Now that you have a clear step by step guide along with tips variations nutrition details and solutions for common problems you are ready to bake your own dutch oven bread at home. Start with the classic version then return to this guide whenever you feel inspired to try herbs cheese seeds or whole grains.
Encourage your readers to share their own experiences in the comment section of your food blog. Invite them to describe how their loaf turned out and which variations they tested. You can also guide them toward related recipes such as hearty soups stews and spreads that pair beautifully with fresh warm bread. With each visit and each new loaf your simple dutch oven bread recipe can become a trusted favorite in many home kitchens.